
The Ultimate Oil Change Checklist for Brampton Car Owners: Tips and Recommendations.
Maintaining your vehicle’s engine is essential for ensuring its longevity and performance. One of the most crucial aspects of engine maintenance is regular oil changes. For car owners in Brampton, understanding the ins and outs of oil changes can help you keep your vehicle in optimal condition and avoid costly repairs. This comprehensive guide provides a detailed oil change checklist, along with tips and recommendations specifically tailored for Brampton car owners.
Understanding the Importance of Regular Oil Changes
Oil is the lifeblood of your vehicle’s engine. It lubricates moving parts, reduces friction, and helps to prevent overheating. Over time, oil breaks down and becomes less effective due to contaminants like dirt, metal particles, and carbon buildup. Regular oil changes are necessary to ensure that your engine remains well-lubricated and operates smoothly.
Benefits of Regular Oil Changes:
- Improved Engine Performance: Fresh oil ensures that your engine runs efficiently, which can enhance overall performance and fuel economy.
- Extended Engine Life: Regular oil changes reduce wear and tear on engine components, extending the life of your vehicle.
- Prevention of Engine Damage: Dirty or degraded oil can lead to engine overheating and damage, which can be costly to repair.
- Enhanced Fuel Efficiency: Clean oil reduces friction in the engine, leading to better fuel efficiency.
When to Change Oil
The frequency of oil changes can vary based on factors such as your vehicle’s make and model, driving habits, and the type of oil used. Generally, it is recommended to change your oil every 5,000 to 8,000 km, or every 3 to 6 months. However, always consult your vehicle’s owner’s manual for manufacturer-specific recommendations.
Factors Affecting Oil Change Intervals:
- Driving Conditions: Frequent short trips, extreme temperatures, and heavy traffic can necessitate more frequent oil changes.
- Type of Oil: Synthetic oils typically last longer than conventional oils, allowing for extended oil change intervals.
- Vehicle Usage: If you use your vehicle for towing or heavy-duty driving, more frequent oil changes may be required.
The Ultimate Oil Change Checklist
Follow this comprehensive checklist to ensure that your oil change is thorough and effective:
1. Gather Your Supplies
Before starting the oil change, make sure you have all the necessary tools and materials:
- New Oil: Check your owner’s manual for the recommended oil type and quantity.
- New Oil Filter: Ensure compatibility with your vehicle’s make and model.
- Oil Filter Wrench: For removing the old oil filter.
- Socket Wrench Set: For removing the oil drain plug.
- Oil Drain Pan: To catch the old oil.
- Funnel: To pour the new oil without spills.
- Rags or Shop Towels: For cleaning up spills and wiping down the engine.
- Car Jack and Jack Stands: If performing the oil change yourself, ensure you can safely lift and secure your vehicle.
2. Prepare Your Vehicle
Park on a Level Surface
Ensure your vehicle is parked on a flat, stable surface. Engage the parking brake to prevent any movement.
Raise the Vehicle
If necessary, use a car jack and jack stands to lift the vehicle. Ensure it is securely supported before proceeding.
Warm Up the Engine
Run the engine for a few minutes to warm up the oil. Warm oil flows more easily and helps to remove more contaminants during the draining process.
3. Drain the Old Oil
Locate the Oil Drain Plug
Find the oil drain plug on the underside of the engine. Consult your vehicle’s owner’s manual if you’re unsure of its location.
Position the Drain Pan
Place the oil drain pan underneath the drain plug to catch the old oil.
Remove the Drain Plug
Use a socket wrench to loosen and remove the drain plug. Allow the old oil to drain completely into the pan. Be cautious, as the oil may be hot.
Replace the Drain Plug
Once the oil has fully drained, clean the drain plug with a rag. Reinstall the drain plug and tighten it securely with the socket wrench.
4. Replace the Oil Filter
Locate the Oil Filter
Find the oil filter, which is typically located near the oil pan. Refer to your owner’s manual if necessary.
Remove the Old Oil Filter
Use an oil filter wrench to loosen and remove the old oil filter. Be prepared for some oil to spill when removing the filter.
Prepare the New Oil Filter
Apply a small amount of new oil to the gasket of the new oil filter. This helps to create a better seal and makes it easier to remove during the next oil change.
Install the New Oil Filter
Screw the new oil filter into place by hand. Tighten it gently, ensuring it is secure but not over-tightened.
5. Add New Oil
Locate the Oil Filler Cap
Find the oil filler cap on the top of the engine. Remove the cap and place a funnel in the opening.
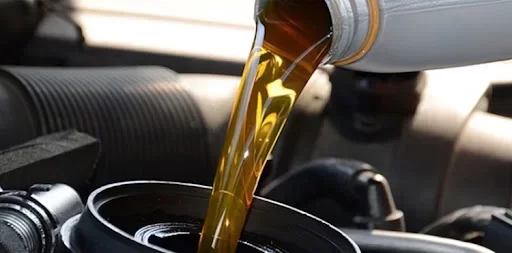
Pour in the New Oil
Pour the recommended amount and type of oil into the engine. Check your owner’s manual for the correct specifications.
Check the Oil Level
After adding the oil, wait a few minutes and then use the dipstick to check the oil level. Add more oil if necessary until the level is within the recommended range.
Replace the Oil Filler Cap
Securely replace the oil filler cap.
6. Clean Up and Dispose of Old Oil
Clean the Area
Wipe down any spills or drips with rags or shop towels. Ensure the area around the drain plug and oil filter is clean.
Dispose of Old Oil
Properly dispose of the old oil and oil filter. Many auto parts stores and service centres offer recycling services for used oil and filters.
Check for Leaks
Start the engine and let it run for a few minutes. Check for any leaks around the oil drain plug and oil filter. If you notice any leaks, address them immediately.
Tips for Car Owners in Brampton
- Consider Seasonal Factors
Brampton experiences a range of weather conditions throughout the year, including cold winters and hot summers. Adjust your oil change Brampton schedule based on seasonal factors:
- Winter: Cold temperatures can affect oil viscosity. Consider using a winter-grade oil if you drive in extreme cold.
- Summer: Hot temperatures can cause oil to break down more quickly. Ensure you’re using oil that can withstand high temperatures.
- Follow Manufacturer Recommendations
Always follow the oil change intervals and specifications provided in your vehicle’s owner’s manual. Adhering to these guidelines ensures optimal engine performance and longevity.
- Choose Quality Oil and Filters
Invest in high-quality oil and filters to maximize engine protection. Premium oils and filters provide better performance and longer-lasting protection.
- Regularly Check Oil Levels
In addition to scheduled oil changes, periodically check your oil levels between changes. Topping up as needed can prevent engine damage and maintain performance.
- Use Professional Services When Needed
If you’re not comfortable performing the oil change yourself, consider using a professional service. Many local auto shops and dealerships in Brampton offer reliable oil change services.
- Stay Informed
Stay informed about the latest developments in vehicle maintenance and oil technology. Regularly review your vehicle’s maintenance schedule and any updates from the manufacturer.
Conclusion
Regular oil changes are essential for maintaining your vehicle’s engine health and performance. By following this ultimate oil change checklist and considering the specific needs of Brampton car owners, you can ensure that your vehicle remains in top condition.
Whether you choose to perform the oil change yourself or seek professional assistance at Valvoline Express Care, adhering to best practices and staying informed about your vehicle’s maintenance requirements will help you keep your engine running smoothly and efficiently.
With proper care and attention, you can enjoy a reliable and well-maintained vehicle, navigating the roads of Brampton with confidence and peace of mind.